

How to Connect Multiple Displays to a MacBook
MacBook is powerful computer that offer a range of features and capabilities, including the ability to connect multiple displays. Whether you’re a graphic designer, video editor, or just want to expand your desktop workspace, connecting multiple displays to your MacBook can be a game-changer. In this article, we’ll explore how to connect multiple displays to a MacBook and some tips to get the most out of your setup.
Step 1: Check Your MacBook’s Ports
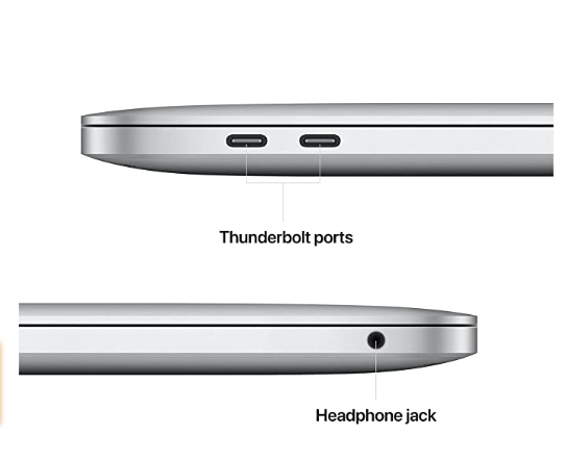
Before you can connect multiple displays to your MacBook, it’s important to check the ports available on your computer. Depending on the model of your MacBook, you may have different types of ports available, such as USB-C, Thunderbolt 3, HDMI, or DisplayPort. Knowing what type of ports you have will help you determine what adapters or cables you need to connect your displays.
Step 2: Get the Right Adapters or Cables
Once you’ve identified the available ports on your MacBook, you’ll need to get the right adapters or cables to connect your displays. For example, if you have an HDMI port on your MacBook but your display has a Display Port input, you’ll need an HDMI to Display Port adapter. Alternatively, if you have a USB-C or Thunderbolt 3 port on your MacBook, you can use a single cable to connect multiple displays using a dock or hub.

Step 3: Connect Your Displays
Once you have the right adapters or cables, it’s time to connect your displays. Here are the steps to follow:
Connect one end of your adapter or cable to your MacBook’s port.
Connect the other end of your adapter or cable to your display’s input port.
Power on your display and make sure it’s set to the correct input source.
Your MacBook should automatically detect the new display and adjust its settings accordingly.
Repeat these steps for each additional display you want to connect to your MacBook.

Tips for Getting the Most Out of Your Setup
Once you’ve connected multiple displays to your MacBook, there are a few tips to keep in mind to get the most out of your setup:
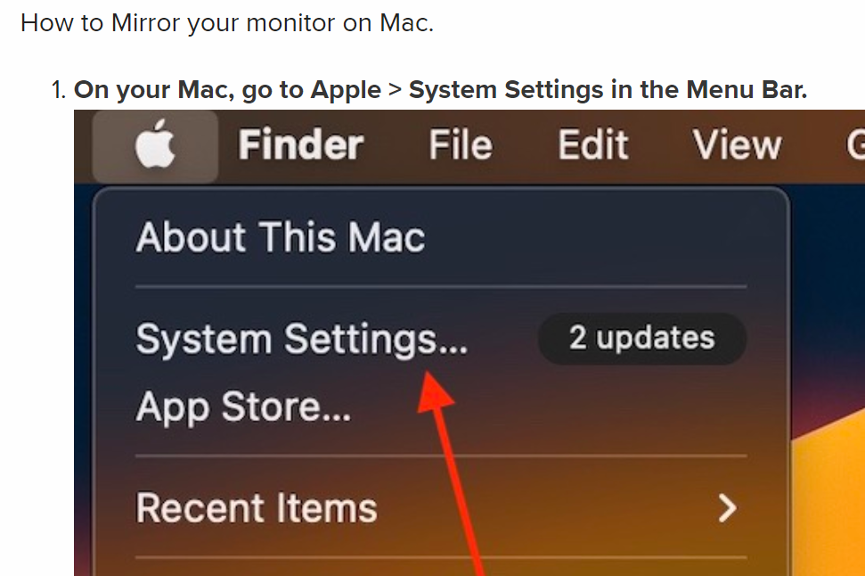
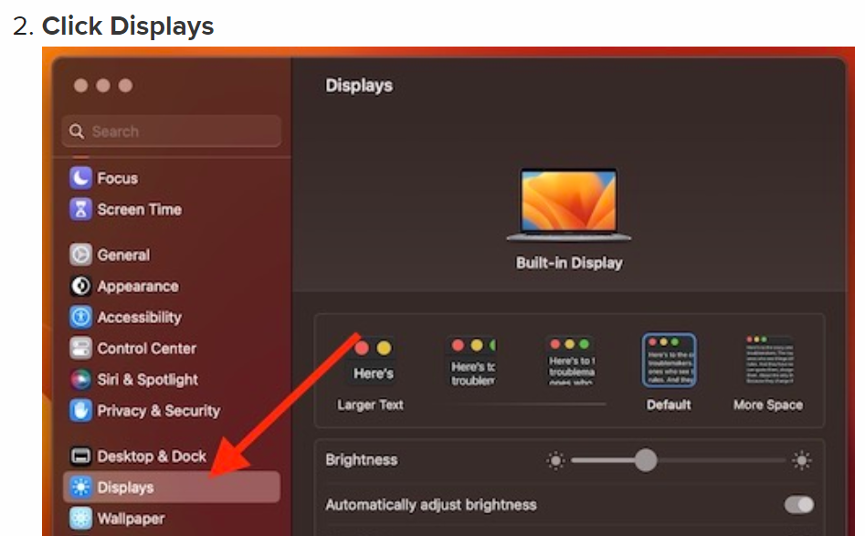
Arrange your displays: By default, your MacBook will extend your desktop across all connected displays. However, you can also choose to mirror your display or set one as your primary monitor. To adjust your display settings, go to System Preferences > Displays.
Use keyboard shortcuts: You can use keyboard shortcuts to quickly switch between displays or move windows between displays. For example, press Command + F1 to toggle between mirroring and extending your desktop across displays, or press Control + Left/Right Arrow to move a window between displays.
Consider a docking station: If you frequently connect and disconnect your MacBook from multiple displays, consider investing in a docking station. A docking station can simplify the process of connecting and disconnecting your displays, as well as provide additional ports for connecting other peripherals like keyboards, mice, and external hard drives.
In conclusion, connecting multiple displays to your MacBook can be a great way to expand your workspace and increase productivity. By following these steps and tips, you can easily connect multiple displays to your MacBook and get the most out of your setup.